How to Fix SSH Connection Refused Error: A Detailed Guide
Are you experiencing a “SSH Connection refused” error when connecting to your website using SSH?
Don’t worry. You’re not alone.
This error can be quite common when using programs like PuTTY to access your web server.
Some common occurrences of the “Connection Refused” error include the absence of an SSH client, lack of an SSH daemon on the remote server, firewall blocking the SSH port, incorrect SSH credentials or port configuration, and the SSH service being down.
In this article, I’ll tell you what SSH is and its importance in WordPress development. I’ll then delve into the SSH “Connection Refused” error, discussing its causes and providing troubleshooting tips to help you resolve the issue.
By the end of this post, you’ll be equipped with the knowledge and tools to get your SSH connection up and running smoothly again. Let’s jump right in and tackle this problem together!
Understanding the SSH “Connection Refused” Error
SSH “Connection Refused” Error is displayed when a user cannot connect to an SSH server. It occurs when the server is not accepting connections, or there is a problem with the network connection between the client and the server.
To understand the root cause of this error, let’s explore some potential factors:
- Network issues: If your network is experiencing performance problems, it can also affect the SSH connection.
- Incorrect credentials: Mistakes in the hostname, username, password, or port can prevent SSH from successfully connecting.
- SSH not installed: Although SSH is typically pre-installed on web hosts, certain dedicated hosting plans may require manual installation.
- SSH service down: SSH service can be disrupted for reasons such as DDoS attacks or excessive traffic.
- Firewall restrictions: Institutions like universities, corporate offices, and schools often block traffic on port 22 (SSH port 22 connection refused), the default SSH port.
I’ll delve into practical solutions to address each of these potential culprits, ensuring that you no longer have to encounter the frustrating SSH “Connection Refused” error.
Why Is It Important to Fix SSH “Connection Refused” Error?
Fixing the SSH “Connection Refused” error is crucial for the following reasons:
- Restore Access: The error prevents you from establishing an SSH connection, which is essential for managing your server, performing administrative tasks, and troubleshooting issues. Resolving the issue promptly restores your access to the server.
- Efficient Troubleshooting: SSH is often required to effectively troubleshoot server-related problems. By resolving the connection refused SSH error, you can streamline the troubleshooting process and address other issues more efficiently.
- Ensure Security: SSH provides secure remote access to your server, protecting your data and preventing unauthorized access. If the “Connection Refused” error persists, it may indicate potential security vulnerabilities. Resolving the issue ensures a secure environment for your server.
- Maintain Workflow: SSH offers advanced features and command-line access, enabling efficient workflow and faster execution of tasks. Resolving the error allows you to resume utilizing the full capabilities of SSH, enhancing your productivity and development processes.
- Prevent Data Loss and Downtime: The inability to establish an SSH connection can lead to data loss, service disruptions, or extended periods of downtime. Resolving the issue promptly helps prevent potential data loss and ensures the continuous availability of your server and services.
Common Reasons for the SSH “Connection Refused” Error
This section will explore the primary causes behind the SSH “Connection Refused” error. By identifying these common causes, we can better understand why the error occurs and proceed with the appropriate troubleshooting steps.
Absence of SSH Client on the Local Computer
One of the primary causes of the SSH “Connection Refused” error is the lack of SSH client software installed on the localhost. The SSH client software is crucial for facilitating secure connections to SSH servers by implementing the SSH protocol.
Without the necessary SSH client software in place, the ability to initiate connection requests to SSH servers is impeded, resulting in the “Connection Refused” error.
1. Lack of SSH Daemon Installation on the Remote Server
To establish a successful SSH connection, having both the client and server versions of SSH is essential. While the SSH client enables the initiation of connections from a local device, the SSH server is responsible for listening to and accepting incoming connections.
However, an SSH “Connection Refused” issue can occur if the SSH server is missing or improperly configured, leading to the server rejecting incoming connection requests. Thus, ensuring the presence and correct setup of the SSH server is crucial for resolving this error.
2. Firewall Blocking the SSH Port
Firewall restrictions can contribute to the occurrence of the SSH “Connection Refused” error by blocking incoming SSH connections. Operating systems utilize ports to efficiently manage data and traffic for different services.
For example, SSH communication relies on specific ports, with port 22 being the standard, but hosting companies sometimes use different ports.
To avoid the SSH error, it is necessary to apply appropriate firewall rules that allow SSH connection requests to pass through.
3. Incorrect SSH Credentials or Port Configuration
Incorrect SSH credentials or port configuration can also result in the “Connection Refused” error.
Typos or inaccuracies in the SSH username, password, hostname, or port can cause the server to reject the connection request, triggering the error message.
So, it is crucial to ensure the accurate input of these parameters for a successful SSH connection.
The required information includes the hostname (server address), SSH username, password (private SSH key passphrase), and port (typically port 22, but hosting companies may use alternative ports for enhanced security).
4. SSH Service Is Down
If the previously suggested solutions have not resolved the “Connection Refused” error originating from your local device or network, it is important to consider the possibility of an issue on the hosting server.
One potential cause of the error is the SSH service being down on the server. This can occur when the server becomes overloaded due to insufficient resources or experiences sudden spikes in traffic.
Factors such as traffic surges or DDoS attacks can lead to the disabling of the SSH service. As a result, the SSH daemon on the remote server cannot accept connections, resulting in the “Connection Refused” message.
Troubleshooting the “SSH Connection refused” error Error
Once you’ve identified the root causes of the SSH “Connection Refused” error, it’s time to take action and implement the necessary fixes.
I’ll delve into six proven methods to help you resolve this error and restore a functional SSH connection. By following these methods, you’ll be on your way to resolving the issue and regaining access to your SSH server. Let’s explore these solutions in detail.
While working on resolving the SSH “Connection Refused” error, you may also encounter other network-related errors. One common issue is the “ERR_CONNECTION_TIMED_OUT” error.
To learn more about troubleshooting this error, check out our comprehensive guide on how to fix the ERR_CONNECTION_TIMED_OUT error. This resource will help you identify and address potential issues related to network connectivity and server response times.
Method 1: Installing and Configuring the SSH Client
To establish an SSH connection using PuTTY or similar programs, it is essential to have a daemon program installed on the server. This small program operates by continuously monitoring incoming connection requests and accepting them if the credentials provided are correct.
In most cases, servers, especially managed WordPress hosts, come pre-installed with the necessary daemon program. However, if you are utilizing a dedicated host, it may require manual installation of the daemon.
Having the daemon program installed ensures that the server can accept SSH connections, allowing you to establish a secure and authenticated connection to your server.
Solution: Install SSH Client
To determine if you have the SSH client installed on your system, you can perform a quick check in the terminal window.
Simply type “ssh” and hit Enter.
If the terminal displays a list of available ssh command options, it indicates that the SSH client is already installed on your system. However, if the response is “command not found,” the SSH client is not installed, and you will need to install the OpenSSH Client to enable SSH functionality.
To install the SSH Client on your machine, follow these steps:
- Open the terminal on your system.
- Depending on your operating system, execute one of the following commands:
For Ubuntu/Debian systems:
sudo apt install openssh-client
For CentOS/RHEL systems:
sudo yum install openssh-client
If you are a Cloudways user, enabling SSH access is a straightforward process through the Cloudways platform. Follow these steps to enable SSH access:
- Log in to the Cloudways Platform using your email address and password.
- From the top menu bar, select Servers.
- Choose the server where your desired application is hosted.
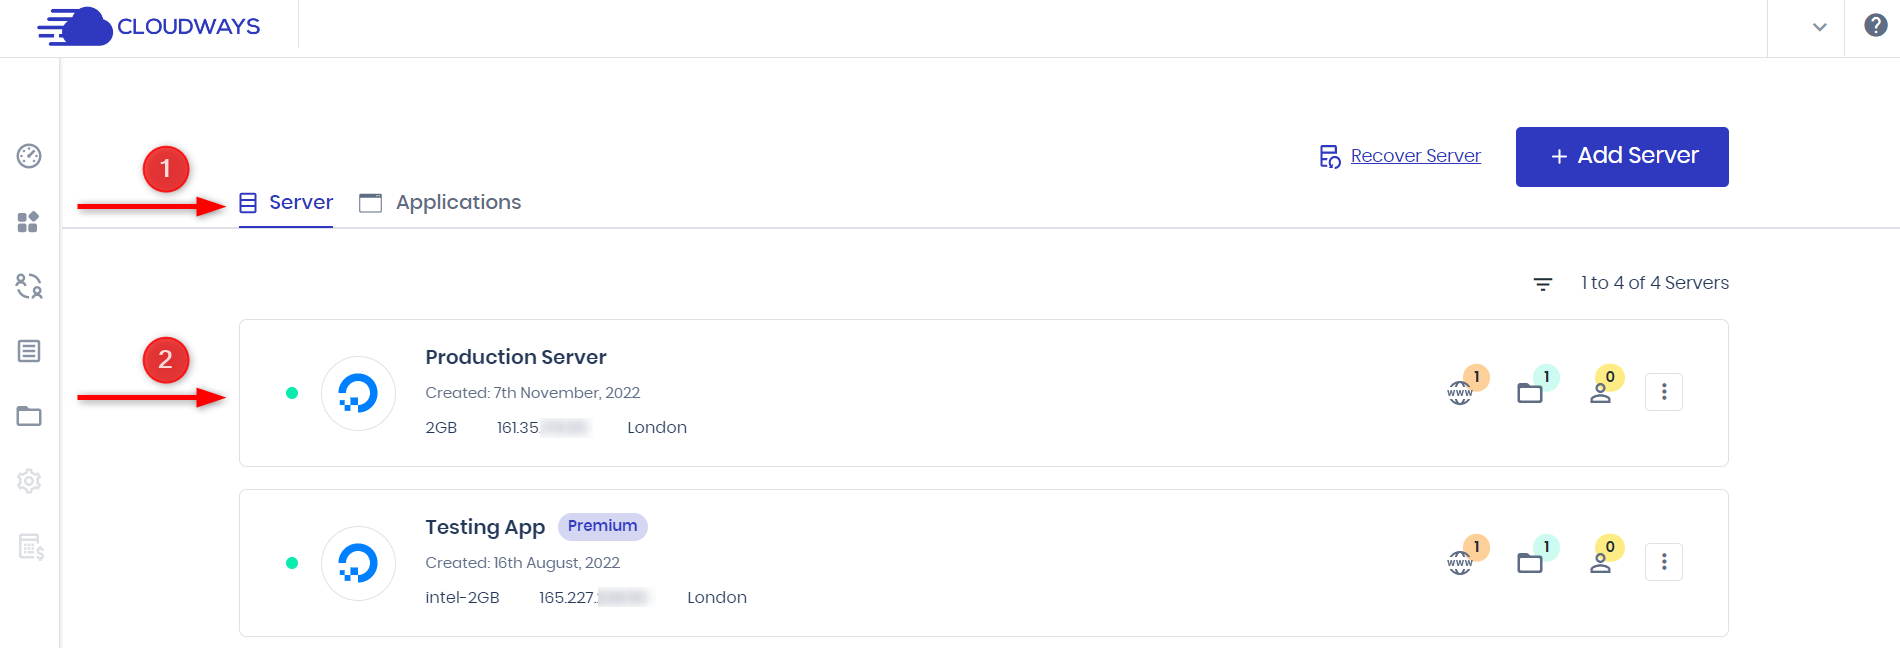
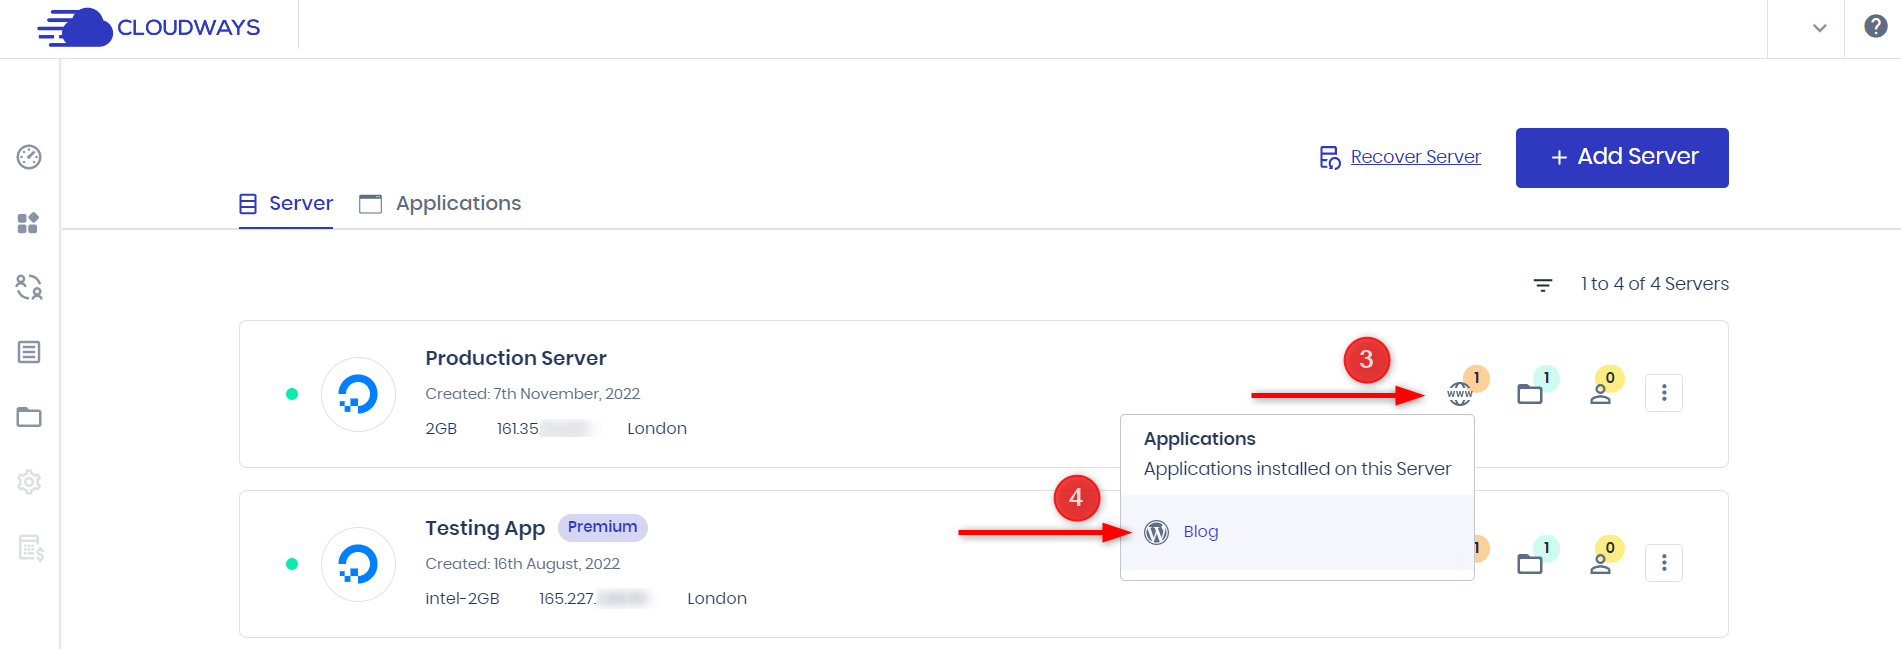
- Select the www option.
- Locate your desired application’s name and click on it.
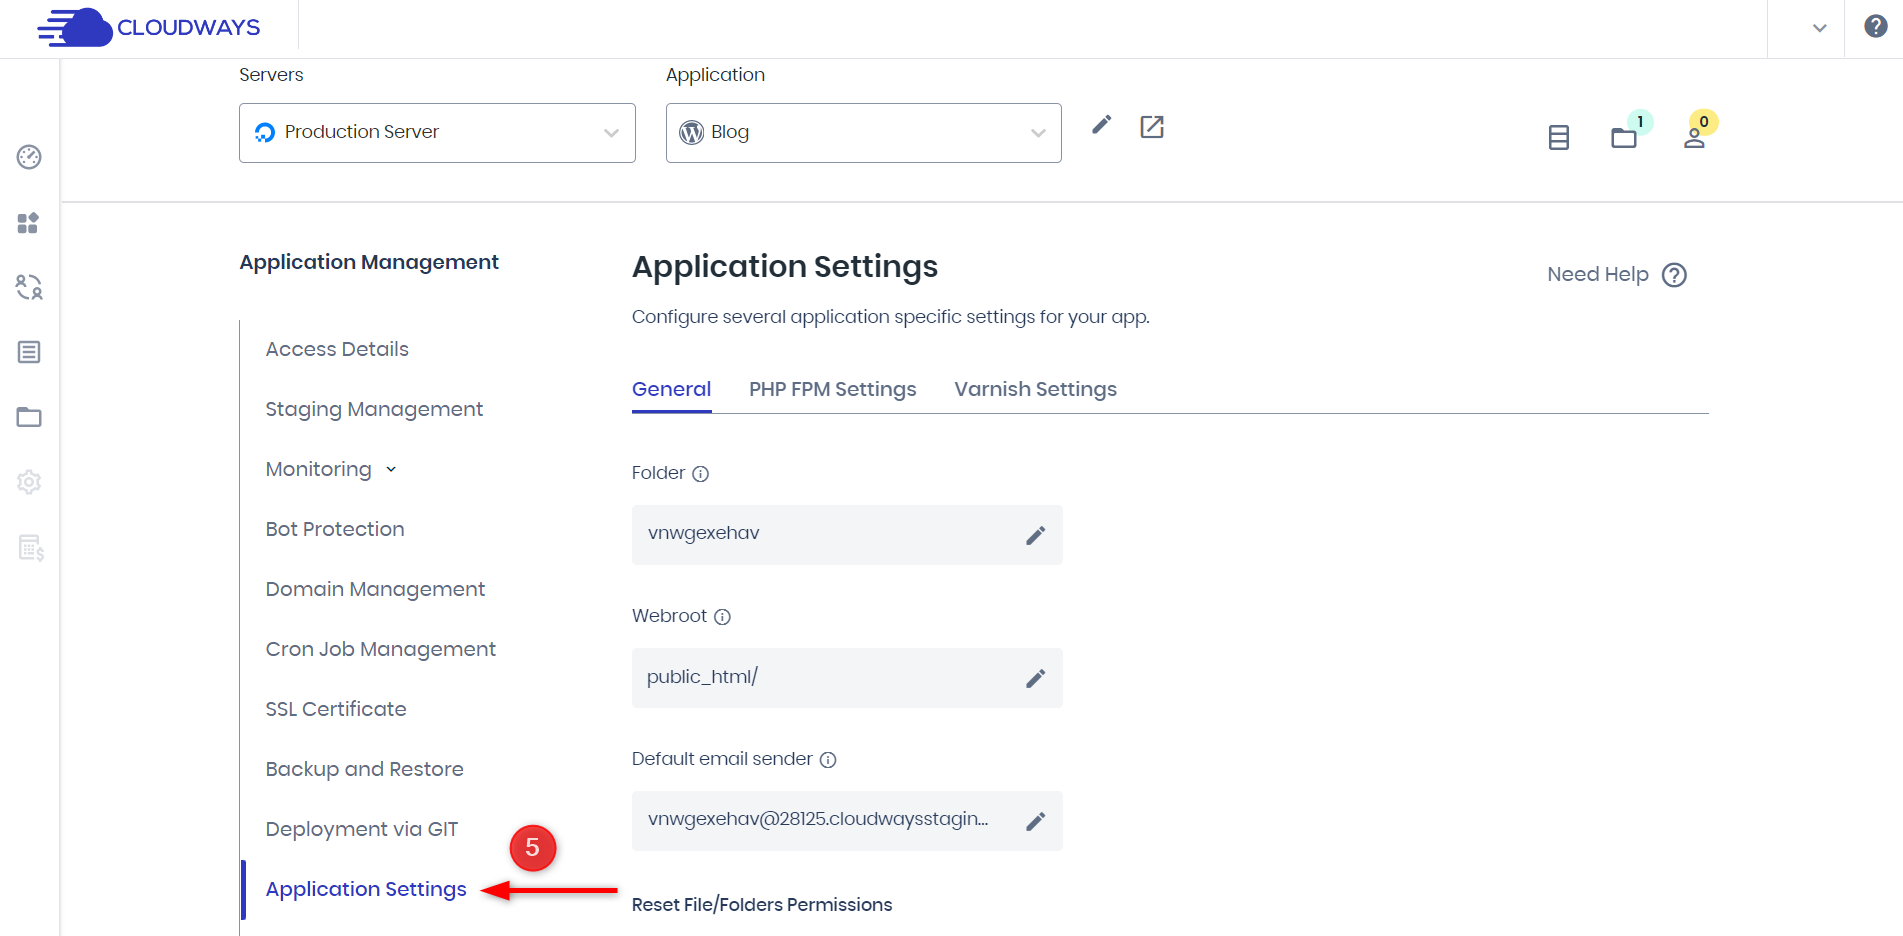
- Under Application Management, navigate to Application Settings.
- Look for the Enable SSH Access option and toggle it on.
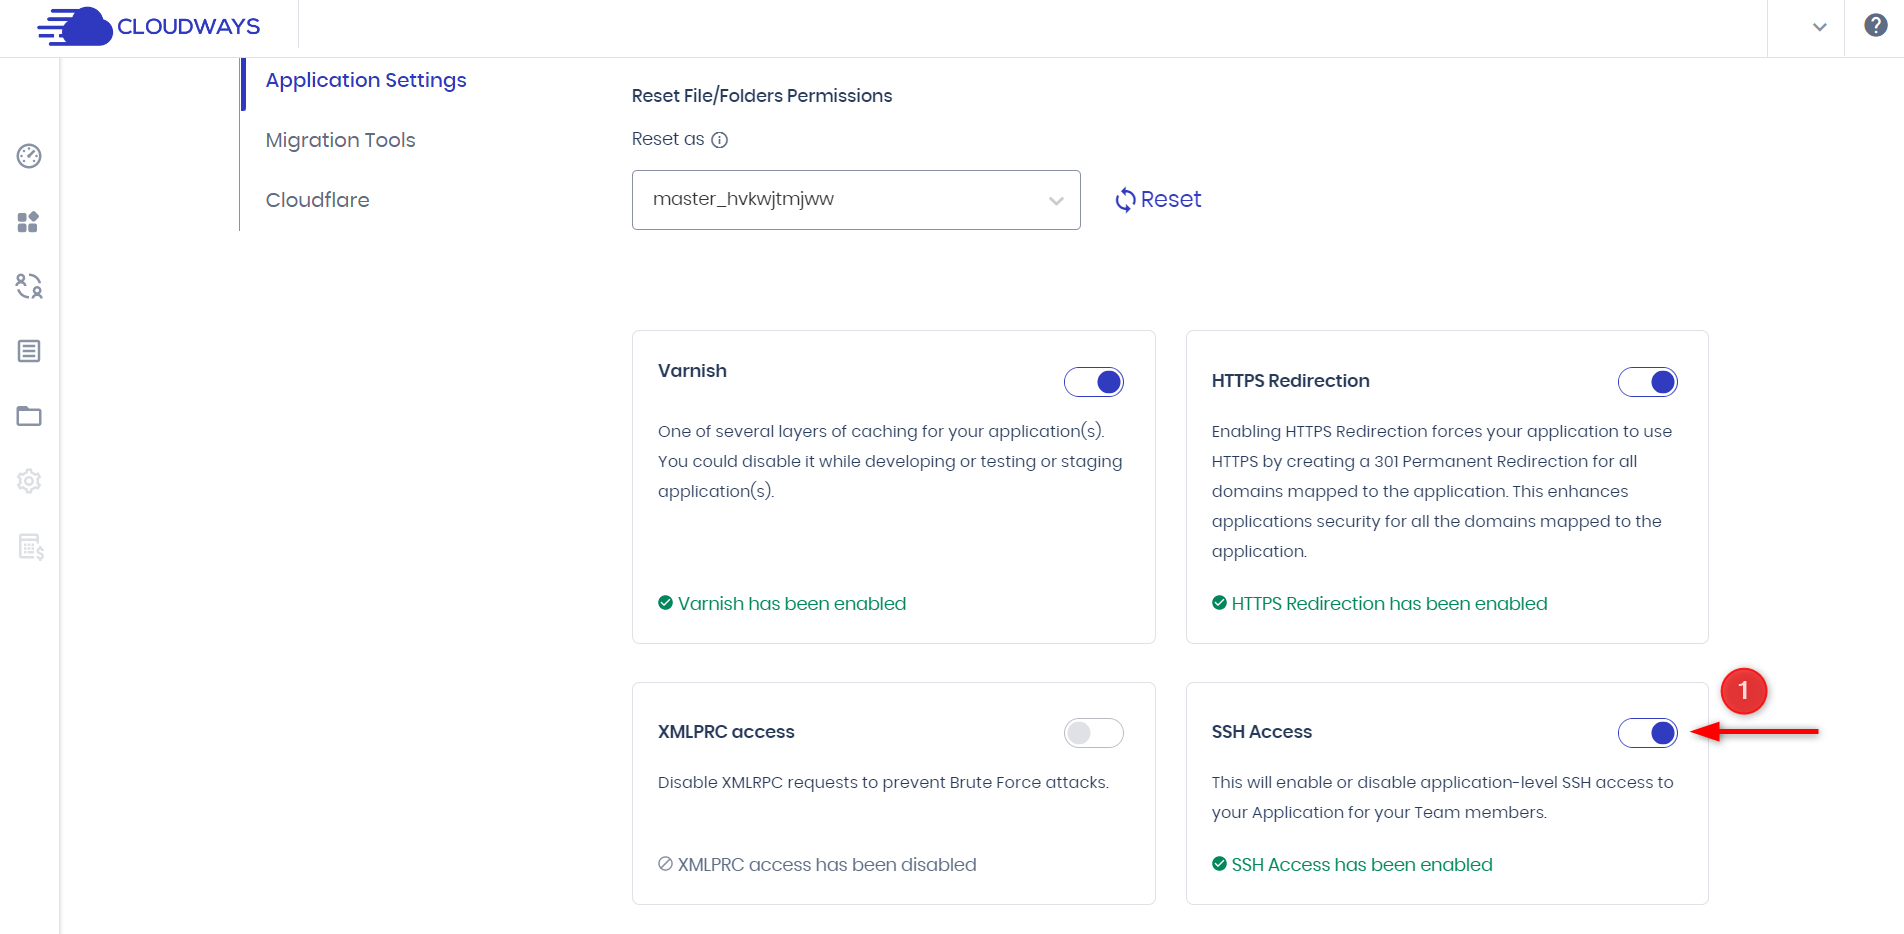
- When prompted to confirm enabling SSH access, click OK.

- With SSH access enabled, all the Application Credentials defined for that specific application will have SSH access in addition to the default SFTP access.
Method 2: Ensuring the Presence of SSH Daemon on the Remote Server
If the SSH daemon is unavailable or not running, it can result in blocking incoming connections to the SSH localhost.
Solution: Install SSH Daemon Package Manually
Most web hosting companies typically include a pre-installed SSH daemon on their servers. However, if the SSH daemon’s status is reported as Down, you should contact your hosting provider to address this issue.
Whether the service is active or not, you can see the status by entering this command:
sudo service ssh status

If you manage your dedicated server or localhost, manually installing the SSH daemon package becomes necessary.
Installing the OpenSSH client and server applications is a simple process. For instance, to install the OpenSSH client applications on an Ubuntu system, you can use the following command in the terminal:
sudo apt install openssh-client
Likewise, to install the OpenSSH server application and related support files, execute the following command in the terminal:
sudo apt install openssh-server
By executing these commands, you can install the required components to ensure the proper functioning of the SSH daemon and establish successful SSH connections.
Method 3: Addressing Firewall Issues to Allow SSH Connections
If you are experiencing an “SSH Connection refused” error, your server’s firewall is likely blocking incoming SSH connections. To resolve this issue, you must apply specific firewall rules allowing SSH connection requests.
Solution: Allow SSH Connections Through the Firewall
To determine the SSH port used by your server, you can execute one of the following commands in your server’s terminal:
$ grep Port /etc/ssh/ssh_config$ grep Port /etc/ssh/sshd_config
These commands will display the SSH port configured on your server. Remember the port number for the next steps.
To check if the firewall is blocking the SSH port, you can use a tool like InfoByIp. Enter your domain or server’s IP address, ensure that port 22 is listed for SSH, and click Check.
If the connection test is successful, it indicates that the issue is not related to the port but to your computer or network connection. In that case, you should review your firewall rules or contact your system administrator for assistance.
To allow SSH connections through the firewall and fix the issue, you can utilize ufw (Uncomplicated Firewall), a command-line interface tool for managing firewall configurations. Follow these steps:
- Open a terminal window on your server.
- Enter the following command:
- This command tells ufw to allow incoming SSH connections on the default SSH port (port 22). If your SSH port differs, replace ssh with the appropriate port number. For example, if your SSH port is 2222, the command would be:
- After executing the command, the firewall will be updated to permit incoming SSH connections.
By allowing SSH connections through the firewall, you should be able to resolve the “SSH Connection refused” error and establish SSH connections to your server.
Method 4: Verifying SSH Credentials and Port Configuration
To establish an SSH connection from your client to a server, you must provide specific credentials. If any of these settings are incorrect, the server will respond with a “Connection refused” message.
Here are the details required for an SSH connection:
1. Hostname: This refers to the server’s address, which can be its IP address, server name, or your website’s domain (if the domain’s A record points to the server).
2. SSH username: You must provide the username associated with the SSH server on the website or server.
3. Password: It’s important to note that the SSH user has no separate password. The password prompt actually refers to the passphrase of your private SSH key. SSH keys are used for authentication instead of passwords.
4. Port: The default port for SSH connections is 22. However, for enhanced security, many hosting providers use a custom SSH port instead. For example, in Cloudways, the SSH port is 4200.
You can verify if you have the correct SSH port open by running the following command:
grep Port /etc/ssh/sshd_config

Executing this command will display the output that shows the port number being used for SSH.
Solution: Double-Check the Credentials You’re Entering
Log in to your hosting provider’s control panel to ensure you have the correct credentials. Look for a section that displays the SSH credentials.
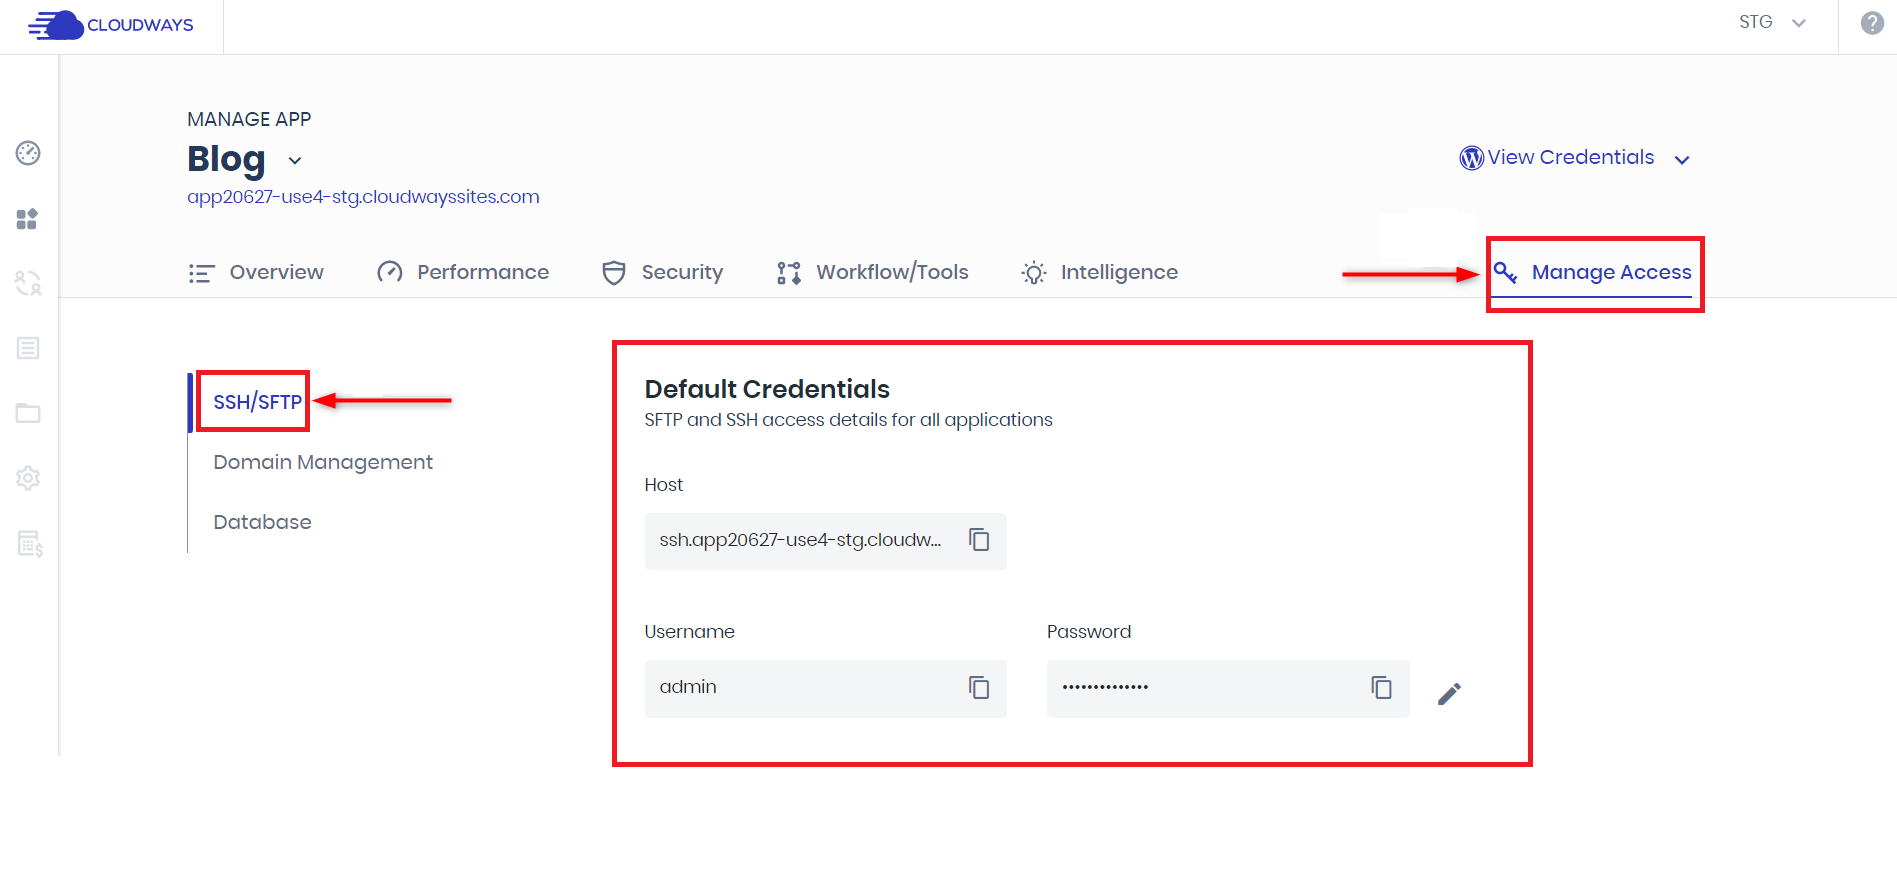
In the Cloudways platform, for instance, you can find the host, application username, and password under the SSH/SFTP section. Make sure to take note of these details and use them exactly. When entering your credentials, it is crucial to double-check and consider the possibility of typos or mistakenly entering the wrong IP address or port. Take care to verify the accuracy of your credentials to ensure they are entered correctly.
Method 5: Restarting or Enabling the SSH Service
Another option to address the SSH “Connection Refused” error is to restart the SSH service.
Solution: Restart SSH Service
This can be accomplished by executing the following command:
The command will restart the SSH service. This action allows the SSH service to restart fresh, potentially resolving any underlying problems and establishing successful SSH connections.
Any potential issues or glitches preventing SSH connections can be resolved by restarting the SSH service.
Additional Tips and Best Practices for SSH Troubleshooting
Now that we’ve looked at some problems and solutions to resolve the SSH “Connection Refused” Error, let’s explore additional tips and best practices for SSH troubleshooting.
1. Exploring SSH Debugging and Logging Techniques
You can use the verbose or debugging modes to analyze SSH problems in Linux. Enabling this mode allows SSH to display detailed debugging messages, aiding in troubleshooting connection, configuration, and authentication issues.
There are three levels of verbosity available:
Level 1 (-v): To activate this level, you can add option -v when accessing a remote server using the ssh command. For example:
Level 2 (-vv): This level provides a higher verbosity level. You can enable it using the -vv option:
Level 3 (-vvv): This level offers the highest verbosity level and provides the most detailed debugging information. To activate it, you can use the -vvv option:
By running the SSH command with the desired level of verbosity, you can obtain valuable insights into any issues occurring during the SSH connection process.
Apart from verbose mode, you can also use another method to diagnose SSH problems by examining the system logs.
Linux distributions typically store SSH-related logs in files such as /var/log/auth.log or /var/log/secure. You can check these logs for any error messages or warnings related to SSH connections.
By utilizing verbose mode and reviewing system logs, you can better understand SSH problems and troubleshoot them effectively.
2. Implementing SSH Security Practices
Implementing proper security practices is essential to protect your SSH connections and ensure the integrity of your system.
Consider the following practices:
1. Disable SSH password authentication: Instead of relying on passwords, use SSH key-based authentication. This method provides stronger security by using public-private key pairs.
2. Set strong passwords/passphrases: If you still use password authentication, ensure you set strong, unique passwords or passphrases for your SSH accounts. Use a combination of uppercase and lowercase letters, numbers, and special characters.
3. Limit SSH access: Restrict SSH access to only authorized users. Regularly review and update the list of allowed users to minimize potential vulnerabilities.
4. Configure SSH to use a non-default port: Changing the default SSH port (22) to a different, non-standard port can help reduce the number of automated scanning attempts and potential attacks targeting SSH.
5. Utilize firewall rules: Configure firewall rules to allow SSH connections only from trusted IP addresses or network ranges. This adds an extra layer of protection by limiting SSH access to specific sources.
6. Disable SSH root login: Disable direct root login via SSH. Instead, use a regular user account and switch to the root user using the sudo command when necessary. This prevents unauthorized access attempts targeting the root account.
7. Regularly review SSH logs: Monitor and review SSH logs for suspicious activities or failed login attempts. Unusual or repeated failed login attempts may indicate brute force or other malicious activities.
3. Regular Updates and Maintenance of SSH Components
Regular updates and maintenance of your SSH components are crucial for keeping your system secure and up-to-date.
Consider the following practices:
1. Keep SSH software updated: Stay current with the latest versions of SSH software, including both the client and server components. Regularly update your system’s SSH packages or software to benefit from security patches and bug fixes.
2. Enable automatic updates: Configure your system to automatically update SSH software whenever updates are available. This ensures that critical security patches are promptly installed.
3. Periodically review SSH configurations: Regularly review and audit your SSH configurations, including SSH server settings and client configurations, to ensure they align with your security requirements and best practices.
4. Backup SSH configurations and keys: Create regular backups of your SSH configurations and key files. This helps protect against accidental loss or corruption of SSH settings and ensures you can restore them if needed.
5. Monitor SSH vendor announcements: Stay informed about security advisories and announcements from SSH software vendors or distributions. Subscribe to relevant security mailing lists or follow official channels to receive timely information about vulnerabilities and patches.
By implementing these SSH security practices and maintaining regular updates and maintenance, you can enhance the security and stability of your SSH connections and mitigate potential risks.
While working on SSH troubleshooting, you might also come across issues related to your website or web application. To learn more about addressing common website issues, check out our comprehensive guide on how to fix common WordPress issues. This resource will help you identify and tackle various problems that may arise during the maintenance and management of your WordPress site.
Summary
Resolving the “SSH Connection refused” error is crucial for establishing secure remote access to your WordPress website. Throughout this troubleshooting guide, we have explored the common causes of the error and provided practical methods to address them.
Understanding the root causes, such as missing SSH clients, firewall blocking, incorrect credentials or port configuration, and SSH service issues, empowers you to effectively troubleshoot and resolve the error.
By following the step-by-step methods outlined, including installing/configuring SSH clients, ensuring the presence of SSH daemons, addressing firewall issues, verifying credentials and port configuration, and restarting/enabling the SSH service, you can overcome these challenges and establish a successful SSH connection to your WordPress website.
Customer Review at 
“Beautifully optimized hosting for WordPress and Magento”
Arda Burak [Agency Owner]
Abdul Rehman
Abdul is a tech-savvy, coffee-fueled, and creatively driven marketer who loves keeping up with the latest software updates and tech gadgets. He’s also a skilled technical writer who can explain complex concepts simply for a broad audience. Abdul enjoys sharing his knowledge of the Cloud industry through user manuals, documentation, and blog posts.
![]()


No Comments